Forex Backtest Friday – Ichimoku Kinko Hyo (part 2)

Welcome to Forex Backtest Friday.

In the previous post, I tested the Ichimoku Kinko Hyo indicator and found it to be reasonably effective on a few currency pairs.

To recap, here are the results for the GBP/JPY (including spread costs) over the past 11 years:

  • 1 hour chart: 79.7% gain
  • 4 hour chart: 51.9% gain

Having established a base level of profitability, the next step is to be a little more discerning about the trades being taken.

One of the suggestions in the comments section was to add a Kumo qualifier, where a buy trade is only taken above the Ichimoku cloud, and a sell trade is only taken below (thanks Zippy Bronstein!).

ichimoku cloud backtest

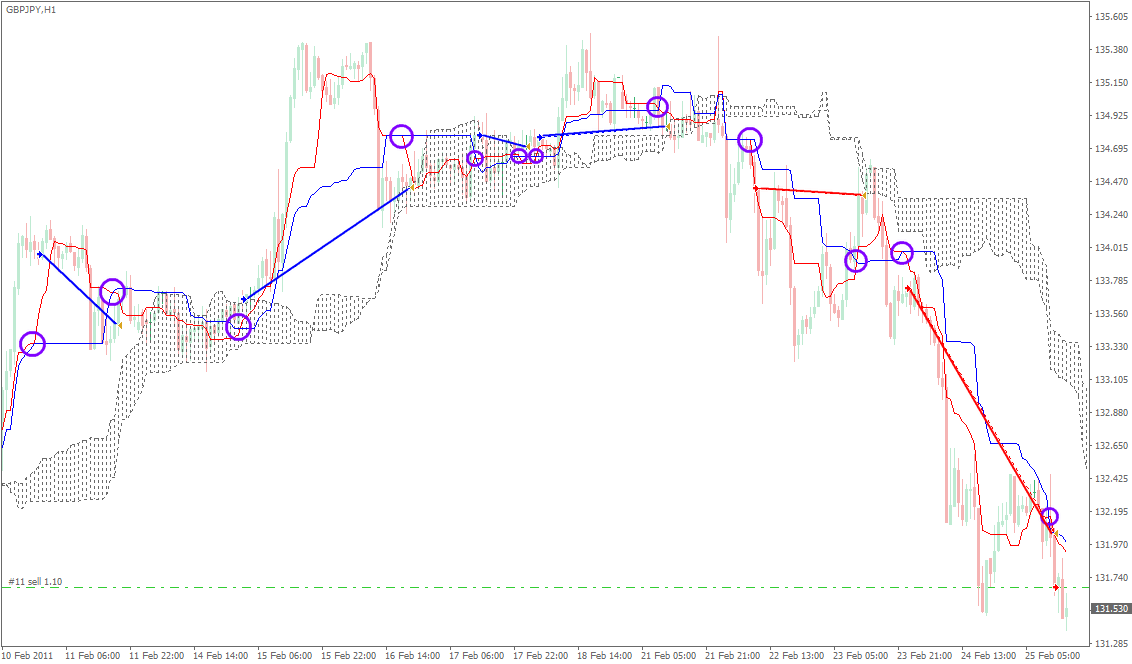
Click image to enlarge

  • Purple circle: Tenkan Sen crosses Kijun Sen
  • Blue straight line: Buy trade open-to-close
  • Red straight line: Sell trade open-to-close

So I put this to the test, and the result was... well, I'll let you see for yourself!

The Results

Here are the results of the backtest (click to view):

ichimoku kumo GBPJPY H1
ichimoku kumo GBPJPY h1 backtest

GBP/JPY 1 hour (includes 1.5 pip spread)

ichimoku kumo GBPJPY H4
ichimoku kumo GBPJPY H4 backtest

GBP/JPY 4 hour (includes 1.5 pip spread)

And here's the summary of the new results, compared with the original:

ichimoku cloud backtest result

When applying the Kumo (Cloud) qualifier, there were 56% fewer trades taken across both timeframes. That's a big reduction!

And the result was a substantial improvement on the 1 hour chart and, interestingly, not on the 4 hour chart.

So it looks like - for the most part - the Kumo cloud is indeed an important aspect of the Ichimoku Kinko Hyo.

So what next?

There's just one more thing left to do.

Recall that in the first Ichimoku backtest I was using a fixed lot size of 1 mini lot per trade.

Now, I can start scaling the lot size based on the account capital. As the account gets larger, I want to be trading with a proportionately larger lot size (and vice versa as the account gets smaller).

To keep things simple, I'll start with 1x effective/actual leverage.
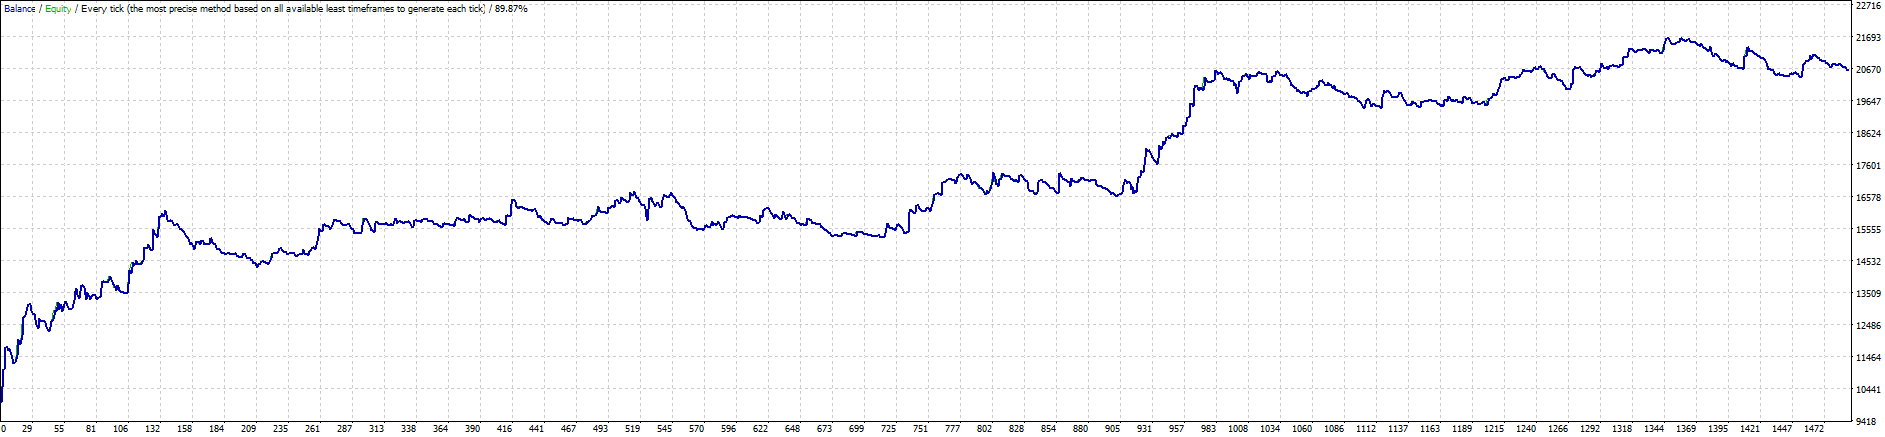
The Results

And here are the results (click to view):

ichimoku kumo GBPJPY H1 1x
ichimoku kumo GBPJPY H4 1x

GBP/JPY 1 hour (1x leverage)

ichimoku kumo GBPJPY H4 1x
ichimoku kumo GBPJPY H4 1x equity

GBP/JPY 4 hour (1x leverage)

To summarize:

ichimoku kinko hyo backtest summary

A drawdown of -20.16% is at the edge of my comfort level, so I decided not to increase the trading leverage as doing so would also increase the drawdown.

And so it looks like we have come to the end of this backtest!

Summary

  • The Ichimoku Kinko Hyo indicator can be effective when applied to specific currency pairs, especially the GBP/JPY.
  • On the GBP/JPY, it performs better on the 1 hour chart than on the 4 hour chart.
  • When applying the Cloud qualifier at 1x leverage on the 1 hour chart, the backtest yields an average 17.1% per year with a maximum drawdown of -20.2% over the past 11 years.

This is a remarkable result, given there had been no parameter optimizations or use of special filters.

But, I have to say that this is not an easy system to trade.

Consider the duration of drawdowns:

  • 3 Jun 2010 - 4 Jun 2012 (24 months)
  • 13 Jun 2012 - 1 Feb 2013 (8 months)
  • 12 Mar 2013 - 7 Jan 2015 (22 months)
  • 20 Feb 2015 - 18 Feb 2016 (12 months)
  • 2 Sep 2016 - 16 Aug 2018 (23 months)
  • 4 Jun 2019 - Present (14 months and counting)

To trade successfully with this indicator you'd have to be able to tolerate up to 2 years of being "unprofitable".

So while the Ichimoku Kinko Hyo could have a place in a portfolio of multiple trading systems, it's probably not one to be traded on its own.

Your thoughts?

What do you think? Did I miss anything? Should I have approached the backtest differently?

Also, what other effects/indicators should I test next?

Let me know in the comments section below!

Forex Backtest Friday – Ichimoku Kinko Hyo

Welcome to Forex Backtest Friday, a post series where I share the backtest results of the market tendencies I investigate.

This week, we'll be taking a look at the "best technical indicator in Forex", according to this article from Babypips. In it, the author says the best indicator is the Ichimoku Kinko Hyo.

If you're not familiar with Ichimoku,

  • Tenkan Sen = Average of the highest high and lowest low over last 9 periods
  • Kijun Sen = Average of the highest high and lowest low over last 26 periods

In the article, the author backtested the crossing of the Kijun Sen by the Tenkan Sen on the EUR/USD daily chart, resulting in 53 trades and a 30.34% profit over 5 years:

ichimoku kinko hyo backtest

In my opinion, 53 trades is too small a sample size... and given that the largest number of test trades is 128 (for the Parabolic SAR), I'm guessing these backtests were done manually. If this is the case then there's a good chance of human subjectivity (bias) embedded in the results.

So I created a robot to run my own backtest of the Ichimoku indicator on the 1 hour and 4 hour time frames. This will result in a larger number test trades, and at the same time greatly reduce the element of human bias.

Buy criteria (reverse for sell):

  • Tenkan Sen crosses above Kijun Sen (upon candle close)
  • Buy on open of next candle

Trade parameters:

  • No stop loss
  • No profit target
  • Lot size per trade is fixed at 1 mini lot
  • When a buy trade is opened, close prior sell trade (and vice versa when opening a sell trade)
    • i.e. There is always one trade open
Ichimoku Tenkan Sen Kijun Sen

Red line = Tenkan Sen | Blue line = Kijun Sen | Chikou Span and Senkou Span not shown

Backtest settings:

  • Test period: 1 Jan 2009 - 31 May 2020
  • Starting capital: $10,000
  • Trading costs are not considered


The Results

Here are the results of the backtest (click to view):

Ichimoku EURUSD H1 backtest

EURUSD 1 hour chart

Ichimoku EURUSD H4 backtest

EURUSD 4 hour chart

Ichimoku GBPUSD H1Ichimoku EURUSD H4 backtest

GBPUSD 1 hour chart

Ichimoku GBPUSD H4 backtest

GBPUSD 4 hour chart

Ichimoku AUDUSD H1 backtest

AUDUSD 1 hour chart

Ichimoku AUDUSD H4 backtest

AUDUSD 4 hour chart

Ichimoku NZDUSD H1 backtest

NZDUSD 1 hour chart

Ichimoku NZDUSD H4 backtest

NZDUSD 4 hour chart

Ichimoku USDJPY H1 backtest

USDJPY 1 hour chart

Ichimoku USDJPY H4 backtest

USDJPY 4 hour chart

Ichimoku USDCAD H1 backtest

USDCAD 1 hour chart

Ichimoku USDCAD H4 backtest

USDCAD 4 hour chart

Ichimoku USDCHF H1 backtest

USDCHF 1 hour chart

Ichimoku USDCHF H4 backtest

USDCHF 4 hour chart

Ichimoku AUDCAD H1 backtest

AUDCAD 1 hour chart

Ichimoku AUDCAD H4 backtest

AUDCAD 4 hour chart

Ichimoku AUDCHF H1 backtest

AUDCHF 1 hour chart

Ichimoku AUDCHF H4 backtest

AUDCHF 4 hour chart

Ichimoku AUDJPY H1 backtest

AUDJPY 1 hour chart

Ichimoku AUDJPY H4 backtest

AUDJPY 4 hour chart

Ichimoku AUDNZD H1 backtest

AUDNZD 1 hour chart

Ichimoku AUDNZD H4 backtest

AUDNZD 4 hour chart

Ichimoku CADCHF H1 backtest

CADCHF 1 hour chart

Ichimoku CADCHF H4 backtest

CADCHF 4 hour chart

Ichimoku CADJPY H1 backtest

CADJPY 1 hour chart

Ichimoku CADJPY H4 backtest

CADJPY 4 hour chart

Ichimoku CHFJPY H1 backtest

CHFJPY 1 hour chart

Ichimoku CHFJPY H4 backtest

CHFJPY 4 hour chart

Ichimoku EURAUD H1 backtest

EURAUD 1 hour chart

Ichimoku EURAUD H4 Ichimoku EURAUD H4 backtest

EURAUD 4 hour chart

Ichimoku EURCAD H1 backtest

EURCAD 1 hour chart

Ichimoku EURCAD H4 backtest

EURCAD 4 hour chart

Ichimoku EURCHF H1 backtest

EURCHF 1 hour chart

Ichimoku EURCHF H4 backtest

EURCHF 4 hour chart

Ichimoku EURGBP H1 backtest

EURGBP 1 hour chart

Ichimoku EURGBP H4 backtest

EURGBP 4 hour chart

Ichimoku EURJPY H1 backtest

EURJPY 1 hour chart

Ichimoku EURJPY H4 backtest

EURJPY 4 hour chart

Ichimoku EURNZD H1 backtest

EURNZD 1 hour chart

Ichimoku EURNZD H4 backtest

EURNZD 4 hour chart

Ichimoku GBPAUD H1 backtest

GBPAUD 1 hour chart

Ichimoku GBPAUD H4 backtest

GBPAUD 4 hour chart

Ichimoku GBPCAD H1 backtest

GBPCAD 1 hour chart

Ichimoku GBPCAD H4 backtest

GBPCAD 4 hour chart

Ichimoku GBPCHF H1 backtest

GBPCHF 1 hour chart

Ichimoku GBPCHF H4 backtest

GBPCHF 4 hour chart

Ichimoku GBPJPY H1 backtest

GBPJPY 1 hour chart

Ichimoku GBPJPY H4 backtest

GBPJPY 4 hour chart

Ichimoku GBPNZD H1 backtest

GBPNZD 1 hour chart

Ichimoku GBPNZD H4 backtest

GBPNZD 4 hour chart

Ichimoku NZDCAD H1 backtest

NZDCAD 1 hour chart

Ichimoku NZDCAD H4 backtest

NZDCAD 4 hour chart

Ichimoku NZDCHF H1 backtest

NZDCHF 1 hour chart

Ichimoku NZDCHF H4 backtest

NZDCHF 4 hour chart

Ichimoku NZDJPY H1 backtest

NZDJPY 1 hour chart

Ichimoku NZDJPY H4 backtest

NZDJPY 4 hour chart

And here's the summary of the results:

Ichimoku Kinko Hyo backtest results

Perhaps unsurprisingly, there's a wide variation of outcomes across currency pairs and time frames.

The first thing to notice is that most of the results are smaller than +/- 60%, which is about +/- 5.5% per year.

I've highlighted the results that are over this threshold. These are the pairs and time frames I'd be interested in investigating further. (For the negative results I can simply flip the buy and sell trades to get a positive result).

One thing I'd like to point out is that I think the author at Babypips may have committed a common backtesting mistake: having too small a sample size of backtested trades. Here's why.

Take this equity curve of the backtest I ran on the EUR/USD 1 hour chart:

Ichimoku Kinko Hyo equity

The red box highlights the gains made over roughly 200 trades. If we only looked at these, we may have (erronously) concluded that the Ichimoku indicator was highly profitable on this pair and time frame. But when we consider all 3000+ trades, we see that it was actually barely profitable with a mere 18.07% return over 11 years. And remember, we have not yet considered trading costs.

So the reason we want a large sample size of backtested trades is to avoid drawing premature conclusions like this.

Ok so let's move on.

The pair that catches my eye is the GBP/JPY. It looks like the Ichimoku indicator is effective on both the 1 hour and 4 hour charts.

To get a more accurate sense of its profitability on this pair, I re-did the backtest with a spread of 1.5 pips. This will lower its net gain but the question is: by how much?

Let's take a look (click to view):

Ichimoku GBPJPY H1 results
Ichimoku GBPJPY H1 equity curve

GBP/JPY 1 hour backtest (including 1.5 pip spread)

Ichimoku GBPJPY H4 results
Ichimoku GBPJPY H4 equity curve

GBP/JPY 4 hour backtest (including 1.5 pip spread)

So the net gain dropped from:

  • 123.1% to 79.7% (1 hour chart), and 
  • 62.0% to 51.9% (4 hour chart)

This works out to an average gain of approximately 7.2% and 4.7% per year, respectively. Not a bad result, considering there had been no performance optimization at all.

From here, I'd be looking to add/tweak certain parameters to improve performance. I might add a stop loss for each trade, and/or include some trade filters. Also, I'd be looking at reducing the drawdown period and/or amount.

It looks like this is a trading approach that - after some tweaking - might be a candidate for forward-testing.

Note: The backtest continues here.

Forex Backtest Friday – Bollinger Bounce

Welcome to Forex Backtest Friday, a new post series where I share the backtest results of the market tendencies I investigate.

This week, we'll take a look at the classic Bollinger bounce.

The idea behind it is that after bouncing off the upper or lower Bollinger band, there is a tendency for prices to move back towards the middle of the Bollinger band channel.

bollinger bounce
bollinger band bounce

example used in Babypips

Is there really such a tendency?

To test this, I coded an expert advisor and ran backtests across the 28 currency pairs from Jan 2009 to May 2020.

Bollinger band setting:

  • Moving average period: 20
  • Standard deviations: 2

Sell setup criteria (reverse for buy setup):

  • Setup candle = Candle with top shadow crossing the upper Bollinger band
  • The Setup candle must close below the upper Bollinger band
  • The range of the candle before the Setup candle must be fully below the upper Bollinger band

Sell trade parameters (reverse for buy trade):

  • Upon Setup candle close, enter a sell trade
  • Stop loss = 1 pip above the Setup candle
  • Profit target = same as the stop loss allowance (1:1 risk-reward)
Bollinger bounce example

*Note: This is not a proper trading strategy. I'm using only the most basic (crude) parameters to test for a mean-reversion tendency following a bounce off the Bollinger bands.

Backtest settings:

  • Test period: 1 Jan 2009 - 31 May 2020
  • No trades to be taken within 1 hour of market open
  • Maximum 1 trade per currency pair, per day
  • Trading costs are not considered

The Results

Here are the results of the backtest (click to view):

Bollinger bounce EURUSD H1

EURUSD 1 hour chart

Bollinger bounce EURUSD H4

EURUSD 4 hour chart

Bollinger bounce GBPUSD H1

GBPUSD 1 hour chart

Bollinger bounce GBPUSD H4

GBPUSD 4 hour chart

Bollinger bounce AUDUSD H1

AUDUSD 1 hour chart

Bollinger bounce AUDUSD H4

AUDUSD 4 hour chart

Bollinger bounce NZDUSD H1

NZDUSD 1 hour chart

Bollinger bounce NZDUSD H4

NZDUSD 4 hour chart

Bollinger bounce USDJPY H1

USDJPY 1 hour chart

Bollinger bounce USDJPY H4

USDJPY 4 hour chart

Bollinger bounce USDCAD H1

USDCAD 1 hour chart

Bollinger bounce USDCAD H4

USDCAD 4 hour chart

Bollinger bounce USDCHF H1

USDCHF 1 hour chart

Bollinger bounce USDCHF H4

USDCHF 4 hour chart

Bollinger bounce AUDCAD H1

AUDCAD 1 hour chart

Bollinger bounce AUDCAD H4

AUDCAD 4 hour chart

Bollinger bounce AUDCHF H1

AUDCHF 1 hour chart

Bollinger bounce AUDCHF H4

AUDCHF 4 hour chart

Bollinger bounce AUDJPY H1

AUDJPY 1 hour chart

Bollinger bounce AUDJPY H4

AUDJPY 4 hour chart

Bollinger bounce AUDNZD H1

AUDNZD 1 hour chart

Bollinger bounce AUDNZD H4

AUDNZD 4 hour chart

Bollinger bounce CADCHF H1

CADCHF 1 hour chart

Bollinger bounce CADCHF H4

CADCHF 4 hour chart

Bollinger bounce CADJPY H1

CADJPY 1 hour chart

Bollinger bounce CADJPY H4

CADJPY 4 hour chart

Bollinger bounce CHFJPY H1

CHFJPY 1 hour chart

Bollinger bounce CHFJPY H4

CHFJPY 4 hour chart

Bollinger bounce EURAUD H1

EURAUD 1 hour chart

Bollinger bounce EURAUD H4

EURAUD 4 hour chart

Bollinger bounce EURCAD H1

EURCAD 1 hour chart

Bollinger bounce EURCAD H4

EURCAD 4 hour chart

Bollinger bounce EURCHF H1

EURCHF 1 hour chart

Bollinger bounce EURCHF H4

EURCHF 4 hour chart

Bollinger bounce EURGBP H1

EURGBP 1 hour chart

Bollinger bounce EURGBP H4

EURGBP 4 hour chart

Bollinger bounce EURJPY H1

EURJPY 1 hour chart

Bollinger bounce EURJPY H4

EURJPY 4 hour chart

Bollinger bounce EURNZD H1

EURNZD 1 hour chart

Bollinger bounce EURNZD H4

EURNZD 4 hour chart

Bollinger bounce GBPAUD H1

GBPAUD 1 hour chart

Bollinger bounce GBPAUD H4

GBPAUD 4 hour chart

Bollinger bounce GBPCAD H1

GBPCAD 1 hour chart

Bollinger bounce GBPCAD H4

GBPCAD 4 hour chart

Bollinger bounce GBPCHF H1

GBPCHF 1 hour chart

Bollinger bounce GBPCHF H4

GBPCHF 4 hour chart

Bollinger bounce GBPJPY H1

GBPJPY 1 hour chart

Bollinger bounce GBPJPY H4

GBPJPY 4 hour chart

Bollinger bounce GBPNZD H1

GBPNZD 1 hour chart

Bollinger bounce GBPNZD H4

GBPNZD 4 hour chart

Bollinger bounce NZDCAD H1

NZDCAD 1 hour chart

Bollinger bounce NZDCAD H4

NZDCAD 4 hour chart

Bollinger bounce NZDCHF H1

NZDCHF 1 hour chart

Bollinger bounce NZDCHF H4

NZDCHF 4 hour chart

Bollinger bounce NZDJPY H1

NZDJPY 1 hour chart

Bollinger bounce NZDJPY H4

NZDJPY 4 hour chart

*Note: These results do not account for trading costs, so ignore the net profit/loss amounts. These backtests are designed to only measure the Bollinger bounce tendency (i.e. win rate).

And here's the summary of the backtest:

Bollinger bounce statistics

The average win rate is approximately 50% on both the 1 hour and 4 hour charts.

So the result is quite clear: There is no observable edge to the Bollinger bounce. Prices are just as likely to move up or down following a "bounce" off the Bollinger bands.

This is quite a surprising result to me, as I've seen many people base their trading strategy on such Bollinger "bounces" over the years.

The data, however, says that the winning probability is no better than that of a coin flip!

Your thoughts?

This is the first of the Forex Backtest Friday series of posts. How are you liking it so far? Would you like me to keep publishing my backtest results?

Is there anything you'd like me to add or remove from future backtest reports?

What effects/technical indicators should I test next?

Let me your thoughts in the comments section below.

Go to Top